Thursday, 28 February 2008

Yet more keyrings

As you can tell I am really enjoying doing these!!!

Four covered with alcohol inks and stamped and one triple embossed and stamped.


Chocolate Biscuit Tin


My daughter bought this tin home from work, unfortunately empty! I loved the black images on the top so rather than cover the whole tin I just hi-lighted them with glitter glue. Decorated the edges with ribbon and hand made punched flowers from an X-cut punch and the top flowers were made with a Sizzix Bigz die, cutting lots of layers from different papers and vellum. Added ribbons and fibres.


Two more vases

My daughter bought these for me from a charity shop. She wanted one as a gift for someone so I decorated them both so she had a choice.

Done the same as previous vases with Joanna Sheen dried flowers to embellish.


Monday, 25 February 2008

Three more keyrings

Three more keyrings

I am really enjoying doing these, here's 3 more two have been coloured with alcohol inks and stamped and one had been triple embossed and an image stamped into it. Don't know what I am going to do with them all though lol


Altered Tin

This was a plain gold coloured tin my Husband bought from Tesco. It contained Christmas Candles but they had been reduced. He bought 4! He figured I could do 'something' with them lol.

I coloured the tin using Alcohol inks and silver mixative. Added ribbon around the side of the lid and base of the tin. Die cut large flowers and punched out lots of small ones to decorate and used a large brad in the centre of the big flower, added bows.

I think it's turned out ok. Just got to find a use for it now!!!!!


Friday, 22 February 2008

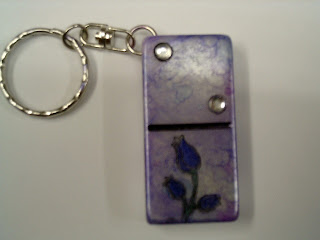
Altered Domino Key Ring

My first altered keyring.

I was sent a gorgeous domino keyring for my birthday plus a couple of blank ones to alter for myself.

My first attempt. I have colured it using alcohol inks and silver mixative and stamped a rose bud image and coloured in the buds using permanent pen with a contrasting colour.

I am really pleased with my first effort.


Wednesday, 20 February 2008

Final Frog


This one is simply done by stamping my image on some 'water' printed vellum. Again coloured in with Sakura Gel pens. The image was also stamped on white atc as a background under the vellum and attached with brads.

I think it has come out quite effectively even though it is very simple to do.


Another frog

This frog is simple stamping and colured using H2O paints. The edge has been done the same way as the one below.

He looks very serious I think!


Frog ATC's


I must make more of an effort to remember to post here more regularly. Trouble is I forget to take photos before I send my swaps etc. off. MUST DO BETTER!!!!

These are 3 of my ATC's for a swap on Crafting corner forum. The theme is frogs.

This one has been stamped onto a sheet of fantasy film and coloured in with Sakura Gel pens. The edge is done with a glue stick to get an uneaven surface and gold embossing powder then heated to melt.


Thursday, 14 February 2008

Another Valentine Card

This is a card a friend asked me to make for his wife. He wanted something special.

The picture on the left is the card in the box I made, I actually managed to get the aperture in the right place !!! Decorated it with hearts covered with gilding flakes.


The picture below is the card itself. Printed rose vellum as a background mounted on gold mirri card. The heart in the middle is made of 3 hearts I cut in different sizes and layered using foam pads. The roses were then cut and glued in between the layers.

Words were printed on the computer on vellum.


Hope she liked it

Valentine Card


This the the valentines card I made for my Other Half. the picture has come out quite orange but it should be red!!

Vellum printed with roses down the sides, and the heart is done with triple embossing in gold and copper with the cats image stamped in.

I think he liked it :O)

Monday, 11 February 2008

Keepsake box


This was made for a friends daughters birthday. The box was cut out of mountboard and covered with papers from a kit I bought from Create and Craft. I then cut the characters from matching papers and layered them to give a 3D effect, added a bit of glitter and coated the images on all sides and lit with glossy accents.

The box is bound together with ribbons through holes punched with my BIA. The lettering at the bottom has been cut from shrink plastic on the Big Shot then shrunk and coloured. More ribbons and fibres have been added as extra embellishments.

I am very pleased with the overall project.

Thanks for looking :O))


New House card


A card made for a forum friend who is currently moving house. I cut the front into a 'house' shape. I have used off cuts of wood veneer in blue for the roof, window shutters and door and wood coloured veneer for the sills, step etc. Using cut up line peel-offs for hinges and small gold brads a handles. Stamped small flowers and leaves around the door and window added a key and lock brads.

I was pleased with the result. The wood was difficult to cut as it kept splitting, but I got there in the end.


Fat Page, ATC and Tag


First time I have tried one of these for a swap. I think they turned out ok.

Background coloured with Shabby Shutters distress inks and stamped with feather stamps from Tanda. The Peacock again is a Tanda Stamp stamped into gold and bronze UTEE while hot. This is a technique I love doing. The edges are coloured using gold embossing powder and ribbons added.

Ikea Box

This is a box I bought from Ikea. In its original state it was just plain wood. I sanded it down and painted with diluted pale blue emulsion. Then stamped some flowers on it and coloured them in with H2O's. Added a few gem butterflies and there you have it.

It was part of a present for a friend. Her favourite colour is blue. She loved it as she has lots of nick-nacks and is a perfect storage solution for her.

Thanks for looking


ATC Challenges

These are two ATC's made as challenges on the forum. The First one had to be about boats, so here is my effort!


The one below is for 'Copy the Crafter'. The person setting the challenge has to describe what she has done on her ATC and we have to interpret her instructions. This is my entry.